My pseudo-flower design. I would have liked if each of my nails looked more like the design on my thumbnail, but c'est la vie. The base is Sinful Colors Tokyo Pearl. I love this color, except that it's extremely sheer and needs multiple coats to be opaque. And with each coat, if you accidentally nick it or make any type of imperfection, it will show through. But the color is so pretty that it's almost worth it. So, about three coats of Tokyo Pearl, then I used Seche Vite to dry it.
To make the designs, just draw the black outline with a black striper (I used L.A. Colors Black), then line the inside with a pink striper (I used L.A. Colors Pink).
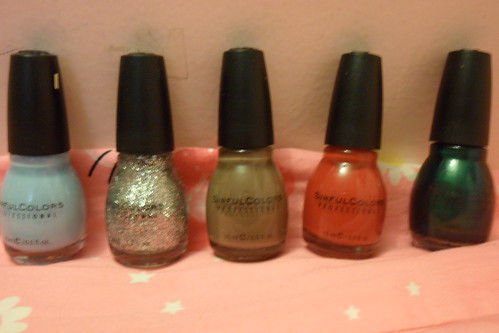
Plus, my nail haul from last week. All Sinful Colors are from Walgreens (which had a 99 cent sale for SC), and the other picture is all from Rite-Aid. I know, 17 polishes sounds extreme. But they were all such a good deal!
From left to right: Sinful Colors Savage, Queen of Beauty, Nirvana, Boogie Nights, and San Francisco.
I'll update with the names later tonight because I don't have the polishes right next to me. As always, will swatch on request.
I love buying nail polish on a discount because, even if the color doesn't suit my skintone or tastes, I have friends who, knowing I'm a nail polish junkie, are always willing to take it off my hands.
And that's it! I'll have a new design hopefully on Monday, and maybe I'll get around to posting up all the nail art tools and decorations that I got off eBay (: 'Til then!
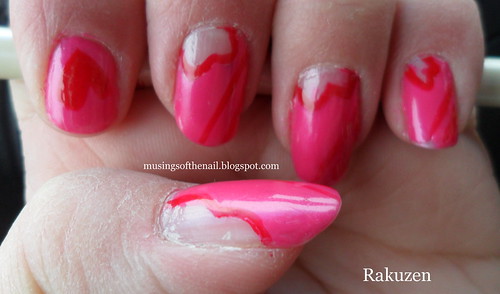
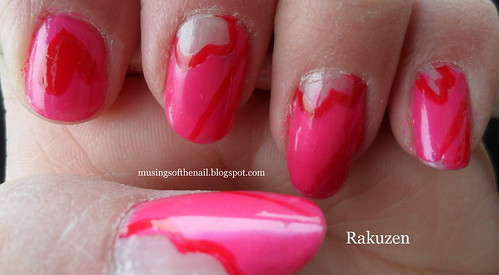
It's been awhile, but I finally have some nail art to share! I found this design while scrolling through soompi designs, and I saved this one among others. To be honest, I didn't realize that it was Valentine's day, and I was planning on doing this with OPI Ink instead of a pink and red combination, but I realized how perfect this design would be for V-Day. So you can use any colors if you want to replicate this design.
I used Sinful Colors Oasis for the base. The picture doesn't capture the beauty of this color well enough! It's a bright, gorgeous pink with a subtle shimmer. I know it's been sitting in my collection for months, so I have no clue why I've never used it! It's so pretty.
For the thumb nail, I decided to use a heart sticker instead of cutting out the hearts, but it was too wide and I didn't like how it ended up. Of course, with Valentine's Day stuff on sale now, it might be worthwhile to find some good heart stickers and purchase them to make it easier.
What you do is press the sticker (or, alternatively, cut hearts out of scotch tape and use that instead) in the corner of your nail. Paint the color all over your nail. I used three coats of Oasis, just because it got even more pretty the more coats were used. Then rip off the heart and outline it with a striper. I used Sinful Colors Be My Valentine Striper. Draw two lines in the corner (optional), wait a few minutes, and apply topcoat. So pretty! It's a very simple design, too.
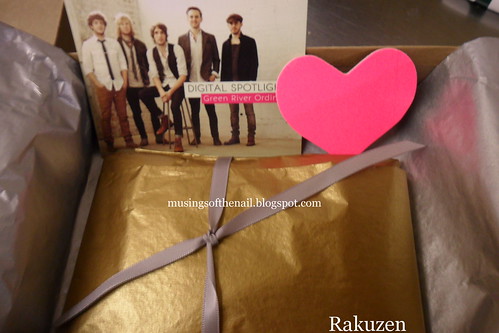
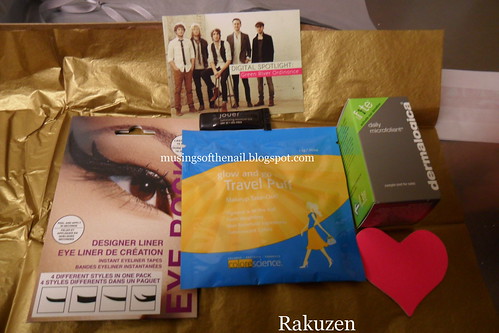
Also, I received my Birchbox for February in the mail yesterday! I only found out about Birchbox last month, and now I want to know where it has been all my life! It's so pretty and professionally put together, and a great way to try new things.
The box. It is made of sturdy cardboard, and it's so cute and very strong.
The inside when you open the cover. I love how pretty these are! You could totally just take the birchbox and give it to your friend as a present. It's already wrapped on the inside! The bow is such a nice touch, I was totally surprised.
The contents of my Birchbox. From left to right: Eye Rock Designer Eyeliner. These are single-use, stick on liner strips that come in four different styles. I haven't tried them out yet, but they look so cool! A card for six free songs from Green River Ordinance, an indie rock band. Jouer Luminizing Moisture Tint. colorescience pro Glow and go Travel Puff. Dermalogica Daily Microfoliant. And a neon pink, heart-shaped, Lifestyle Extra nail file.
This box is so cool! I love it all, and I can't wait to use it. And isn't that nail file adorable? I usually carry around a crystal nail file at school, but I think I might swap it out for this.
Stay tuned! Later this week (or hopefully, tomorrow at the earliest) I will have my nail haul for the week. And it is INSANE.
Yesterday I finally got around to picking up the new SensatioNail Invincible Gel Polish from Nailene, at Walmart. It was $49.95, but there is a $5 off coupon available on their Facebook. I'd been debating for a few weeks on whether to get it or not, because it was rather pricey, but I finally gave in.
The outside of the box. I picked the Starter Kit in Raspberry Wine, as the other option (as far as Starter Kits go. They have ten other colors) was Scarlet Red.
Flip up the top, and on the inside of the box is this. I love it!! It's, obviously, flimsy cardboard, but it is quite cool. The top holds all the polishes, while the bottom holds the nail packet, and the adapter for the LED lamp.
The LED lamp. A small, "Pro 3060 LED Lamp." It's very nice and doesn't take up a lot of space. It worked pretty well, from what I can tell, although this was my first experience with gel nails at all. It comes with an adapter that plugs into the wall, so no batteries, which is nice because I never have any.
The top level of the cardboard shelf held these. From left, the Gel cleanser, Gel Primer, Raspberry Wine Gel Color, and the Gel Base & Top Coat.
The bottom level held this. A manicure stick to push back your cuticles, a double-sided nail buffer, and a pack of Lint-Free Wipes.
The process is very simple. Buff your nails lightly and push back your cuticles. Pour a little bit of the gel cleanser onto one of the Lint-Free Wipes (one thing--I highly doubt anyone else is stupid enough to do this, but when I first saw it, I had thought that it was one huge wipe and thought "oh, that must be re-usable!" Then I started pouring some of the gel cleanser on it, and realized it was a bunch of thin wipes. So make sure you separate them.) and wipe your nails.
Then coat your nails with gel primer and cure for 30 seconds. This LED lamp is awesome-- I had my iPod on next to me as a timer, but the lamp beeps after 30 seconds. Sadly, it doesn't do it after 60 seconds but it's not too much of a problem. Either just count it out or use a timer. One coat of the base gel, cure for 30 seconds. Next, coat your nails with a thin coat of the color gel, cure for 60 seconds. Do a second coat of color gel, cure for sixty more seconds. Then apply a coat of the top coat, and cure for 30 more seconds.
After that, you can wipe your nails off with the gel cleanser. This doesn't take away the color or anything, but the nails are slightly sticky after the last cure, so if you don't want them to be like that, then wipe them down.
This was the finished product. I only did it on one finger to test, although I will definitely be trying it again after I get my hands on some acetone. That is the one thing the kit doesn't come with, which I wish it did, because I don't live near any beauty supply stores and it is kind of a pain to find. You can use regular nail polish remover, I think, but it will take much longer.
And also, as you can see, I accidentally got some of it on my cuticles, so be careful of that, too. And either I didn't do a good job with the application (likely) or the polish is slightly sheer, because two coats of the polish didn't make it fully opaque. Regardless, it got the job done. After under five minutes for one nail, it was colored and dry to the touch.
I'm hoping to do some experimenting with this-- SensatioNail has posted some nail art ideas on their facebook, like marbling, so I would like to try some nail art. I will also be testing the wear, and I want to try the LED lamp with some other gel nail polishes.
Overall, it's super nice! If the price for the starter kit deters you, don't worry. Considering that, at least at the salon where I got my Dorothy Who manicure done, gel nails can cost upwards of $40 for one application, this is really a steal. The additional kits with other colors were only $20 at my Wal-Mart, so I can definitely see myself picking some up or putting them on a wishlist.