Showing posts with label nail art. Show all posts

Wednesday, October 21, 2015

Nail art: pink and white for Breast Cancer Awareness month

I have a new nail art design for you all! I've been crazy busy all summer and didn't have a chance to do anything beauty or blog-related with school and work, but this semester my goal is to be doing a nail design every week (except for when I have interviews). So far, so good! 

As you probably know, it's breast cancer awareness month! I've done a design for BCA every other year (20112013) and this one is no different. I hope you like it! Personally it was one of my favorite designs I've done in awhile (I have a few more that will show up in the next couple of weeks), and super easy. 


The polishes that I used. The white is Essie Pink Diamond, and the pink is Essie Blanc. The nail art pen is from Sally Hansen. If I were to re-do this design, I probably would not have used either of those polishes. They're pretty colors, but Pink Diamond is a frosty pink, so it shows flaws. It took me like 3-4 coats to make it look pretty even. The white was the same way. And the nail art pen was not great, but it was a little bit better than if I was using a striper polish. I got the nail art pen from a friend, so no loss there, but I'm not sure if I'll buy more of the line. 


Onto the design! To do this design, first paint 2-3 coats of Pink Diamond on all nails except for your ring finger. (Like I said, it took me more coats, but just because it wasn't painting evenly for me). Do french tips with the Essie Blanc, either freehand or using a guide if you need to. (I don't have any guides, but it would make it a lot neater.) Paint your ring finger with 2-3 coats of Essie Blanc. After it's dry, use the nail art pen (or a nail art brush and a darker pink) to draw the ribbon. I use Seche Vite as a top coat because I am impatient and don't like to wait for my nails to dry, but definitely wait to put the top coat on your ring finger until the ribbon is mostly dry. I did not, and accidentally dragged the pink around the white polish, and I had to go in with a nail art brush and touch it up. 

And that's it! Like I said, it's a really simple design and you could really do it for any of the cancer ribbons. Next week my design is simple too, but sticking with the Breast Cancer Awareness month theme. 

Saturday, July 19, 2014

Sunflower nail art!

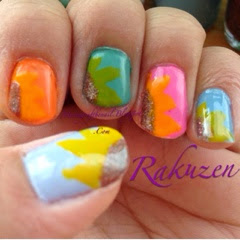
I have some new nail art! It's been ages, but I had a ton of down time today and I was in the mood to do some nail art! I browsed Pinterest (Pinterest.com/rakuzen) and found a cute sunflower ish nail art.

The cast of characters: 
From left: China Glaze Agent Lavendar, Zoya Arizona, Zoya Wednesday, Zoya Shelby, Revlon Dreamer, OPI DS Illuminate, and a Sinful Colors yellow striper. 


First step, two coats of each color. These colors show up on my blog a lot because they're basically the only spring/summery ones that I have. Most are dark and more suitable for fall. 


Then using the brown color, paint a small circle in the corner. Using a yellow striper (it was yellow, although it did turn green on the middle finger), draw petals around the brown circle. Finish with top coat and voila!

Super simple design, but I love it! Has just enough sparkle for me. It was nice to get back into nail art too, I haven't had much time or energy lately with working and taking classes all summer. 

Monday, February 3, 2014

Chinese New Year 2014 nails

新年快乐!! Happy Lunar New Year!

This post is actually a little bit late, but who cares! Chinese New Year lasts for fifteen days ;) the first day was on Friday, but I was too busy eating my mom's cooking and greedily collecting hong bao to care.


A first for my blog (I think). The nail art today was painted by me, but on my sister's nails! She coerced me into doing her nails for her over the weekend. Her nails/hands are about 100x prettier than mine, so really it all worked out!

The red is (surprisingly, not China Glaze Ruby Pumps) from a brand called Venique. I can't find the name because I don't have the bottle, but I highly recommend this brand! The nail polish applied beautifully. Use two coats over a base coat. 

The glittery gold is Julep Oscar. By itself, this polish is really too sheer to look good. Pictured is a few coats, just because I wanted the glitter to be more dense. With a striping brush, apply 2-3 (depending on how sparse or dense you want the glitter to be) coats on a diagonal across the tips. 

For the ring/accent figure, I offered to either attempt to draw a horse or I could write the Chinese character for horse (because it is the year of the horse and, coincidentally, her zodiac sign!), 马. Considering I draw about as well as a second grader, she wisely chose the second option. So using a striper brush and a Venique foil gold (also of unknown name), I drew the character for horse. 

Overall, the design turned out very well! I had managed to leave nearly all my red and gold (since I don't have a lot of either color) in my apartment, but somehow I managed to find the pack of nail polish that Venique sent me, so it all worked out! 

Lastly, sorry about the obnoxious watermark. I usually use Aviary, but since I haven't updated my iPad yet, I couldn't get it to download. I like this one though, plus it's super simple to use!

Up next, I'll probably post a couple of Valentine's Day designs! 

Sunday, December 22, 2013

Christmas Nails! Part 1

I am back! I swear, I did not plan on taking so long to return to my blog, but I have a ton of excuses (finals, malfunctioning computer, no time, etc.). However, as you might have noticed, I am revamping the blog and I am planning on doing a ton more posts, so be on the lookout for them!

 Since Christmas is only four days away, I am planning on doing a post of Christmas/winter/holiday-themed nails every day until then!

First up is a super simple and quick design. This manicure, from start-to-finish, only took me about fifteen minutes. (Admittedly, the lines on the french manicure part are not perfect (I have not figured out the trick yet)), but even with touch-up it should not take too long, so it is the perfect design for beginners.

The cast of characters for this design are:

China Glaze Ruby Pumps, Butter London British Racing Green, and Art Deco Gold.

DSC_0535

The method: Paint two layers of Ruby Pumps as the base on all five nails, then use a striping brush to paint the Butter London British Racing Green on the nail tips of every finger except the middle finger (I just used a brush from one of my Art Deco polishes).  Using the Art Deco Gold, paint a line between the green and red on each nail.

DSC_0531

For the little Christmas tree (which was inspired by a post on my pinterest board, I used the striping brush to paint three triangles on top of each other. When that dried, I used the Art Deco gold to draw a line at the base of each triangle. I could not find any brown nail polish, so I used an Essie (cannot find the bottle... I think it is taupe something) to make a blob to serve as the stump.

So yep, a super simple design that looks amazing and catches the eye (because of all the glitter), and uses Christmas colors!

Tomorrow, I am thinking a snow/snowman design. Stay tuned!


Tuesday, June 18, 2013

Purple and black nail design

I'm back~
Finished product design!
I can't believe that I forgot to put this one up. It is by far, one of my favorite designs so far. I did this during exam week, when I had some free time in between studying. This design is super pretty, easy, and eye-catching, and I got a ton of compliments on it.
Two coats of China Glaze Grape Juice in the natural sunlight. 
I used two coats of China Glaze Grape Juice for the base. I bought this color a year ago and never used it, but I brought it to college with me and figured it would work for this design. It definitely did! This color was gorgeous. A little bit darker than the bottle color, and the color had a very nice shimmer.
Cast of characters. From left: My 2-way nail art pen/brush, Essie Ridge Filling Base Coat, and China Glaze Grape Juice.
After I painted the base, I used my two-way black nail art pen to draw the design. I previously used the pen in my flower nail design, and I've been pleasantly surprised at how well it works!

I hope you enjoy! I have a ton of posts that I've been writing, some product reviews. And next for nail art, because my nails have been weak and I've had to constantly stick my hands in bleach water, I'll be doing some gel nails. Also, a list of polishes that I brought with me to college!

Rakuzen


Tuesday, May 14, 2013

Flowery nails~

Some more nails that I did while preparing for exams. I did fine on them, just in case you were wondering. So doing my nails during the study break may have actually helped? Also it was nice because I haven't had a lot of time to do them throughout the school year.

DSC_0119

They look a little messy, but whatever. I had inspiration from a nail art picture that I had in my files, but I don't really know where the source is. Also, I feel like they were a little messy, but they looked fine up close!

DSC_0119


For the french mani tips, I used my ArtDeco white striper. I never do french tips, but I figured that since I would do a design on them, it wouldn't matter. (And as you might be able to notice if you look closely, it is kind of sloppy.)

Then I used my black nail art pen/brush to draw the branches. I got it for like, a $1 at Rite-Aid during the after-Halloween sale and used for the first time when I did these nails. I love it!

I used Revlon Impulsive for the purple flowers and Essie Mod square for the pink. First time that I used either polish! Then my Seche Vite as top coat.

Hope you like it and that it inspires you to do nail art! I just got a book about Nail Art in the mail that was sent to me for review, so I'll try a few of the designs and post about the book soon. Stay tuned!

`Rakuzen


Tuesday, April 30, 2013

Springtime nails!

These are my nails from last week. I haven't had time to post! But final exam week always gives me time :) Plus, these past few days it has been so warm and spring-y out that I had to make spring time nails!

This was a popular design last year and I really love how cute and simple it is. I tried using spring colors but I only brought about twenty or so polishes with me when I moved to college, so I didn't have as many choices as I would have liked. In fact, I'll do a quick paragraph about that at the end!

DSC_0099

Thumb nail: Zoya Wednesday. Pointer finger: Sally Hansen Wet Cement. Middle finger: Sinful Colors Pull Over. Ring finger: L'oreal Penthouse Pink. Pinky finger: Zoya Arizona.

DSC_0097


I love these polishes (which is why I happened to have them with me). I tried to be as spring-y as possible! I used my Art Deco White nail polish striper to draw lines on each nail (3-4 per nail). On my pointer finger, I finally used one of my dried flowers from the wheel that I bought over the summer. I LOVE THIS NAIL DESIGN!

The polishes that I brought with me to college.

DSC_0114

If you want to know what they are, I can post it. As you can see, lots of polishes haha. China Glaze, OPI, Essie, Butter London. Some of them I haven't used yet though (surprise, surprise). But still! I store them in a small cardboard box on my desk.

Hope you like it! I do have a couple more nail art posts to put up, some product reviews that have been waiting for me. Off to study!

`Rakuzen


Thursday, February 7, 2013

Chinese New Year Nails

新年快乐!!!!!!!!

If you can't read Chinese, that says "Happy new year!" in Chinese!

Sunday is the day for the Chinese New Year/Spring Festival. It will officially be the year of the snake! Yay!

In honor of my favorite holiday of ever, I did my nails! This is exciting because it has, unfortunately, been awhile since I've had time to do that. But here's a quick and simple design that I did.

SAM_0569

I chose red and gold because they are lucky colors in China. The thumb, middle, and pinky finger are all Zoya Stella. My pointer finger is China Glaze Ruby Pumps because it was glittery and I wanted to see how it looked. It was too dark though, so the rest of the nails I did in Zoya Stella. The glittery gold is Butter London West End Wonderland. Such a perfect gold (both for this design and in general!)

SAM_0571

The red and gold design: Paint your nails with base coat (I used Essie's Ridge-Filling base coat), then two coats of your red. Use the gold polish and swipe it diagonally across your nail. It took me about three coats to get the gold to be opaque, but it dried really fast and it is SO glittery and eye catching, especially in the sun!

I had wanted to be able to do more Chinese New Year designs, but I ran short on time. No matter! Chinese New Year lasts for 15 days! So expect at least one more red/gold/Chinese New Year-esque nail design before I move on to Valentine's Day nails! If you're looking for a quick design, I posted a cut-out hearts design last year. I picked up a gorgeous pink Orly at CVS today, so I plan on putting that to good use! (And yes, I realize that I haven't posted any new nail polish purchases. Truth is, I haven't been able to buy nail polish lately because the nearest Rite Aid is kind of far and it's really cold here in Michigan. Oh well, it'll be a good chance to finally use the half of my collection that's been sitting untouched.)

Happy Chinese New Year!


Thursday, January 3, 2013

Sarahita strikes again

I bet that you're doublechecking the URL now to make sure that you got the right nail blog. But have no fear! You have. With Sarahita doing nail designs so often, it gives me time to update the blog and get some reviews in order. (PS, I ordered a camera charger off of eBay because my camera battery died and I lost mine. Then I found mine. I just can't win, apparently.)

I actually have two nail designs from Sarahita to post! (Lucky us! They're really pretty and well-done.)


image


The pink base is China Glaze Temptation Carnation, a pretty shimmery pink while the glitter is China Glaze Polarized from the Prismatic Chroma collection. So pretty! I really do like the picture, too. No flash, but the glitter is really shiny and I think the light's reflecting off of it.

I mentioned this in my last post, but just look at the rows of China Glaze in the background! It seriously makes me drool just looking at it, since my idea of fun is looking at the nail polish racks at salons and stores. Sarahita's mom owns Patrone's Day Spa in Brooklyn, which means that Sarahita has access to tons of nail polish and can do manicures for the blog with lots of different colors! (I bet that it also means that if you guys are burning to see a swatch of a color, she could do that, too!) If you guys happen to be in Brooklyn or Jackson for some reason, definitely stop by!

image

The second design is a gradient! Done using China Glaze Turned Up Turquoise, Blue Sparrow (neon), and Up All Night. Applied with a makeup wedge.

image_2

A quick swatch of China Glaze Four Leaf Clover, which is a matte green. A bit blurry, but I love this color!

It looks so good! I've said it before, but I absolutely adore Sarahita's hands and nails. I really notice people's hands and I love hers. They're so small and cute

Anyway! That's what we have for you guys today! Enjoy!


Tuesday, December 25, 2012

Christmas nails!

Merry Christmas, dear readers!

Today, I actually have some nail art to post for you guys! Granted, it's not mine. But still!

My lovely friend Sarahita is going to send me pictures of her manicures and graciously allowing me to post them on musingsofthenail. Whee! This is nice for two reasons: 1) I haven't had the time to do nail designs (plus the smell just fills up my entire dorm room and it's too cold to open the window) and 2) Sarah has a very nice nail polish collection. Love! She is the one who gave me one of my favorite OPI glitter polishes ever, OPI Shimmer & Simmer from the Burlesque collection.

I might even let her do a guest post! (Although I haven't told her that yet). Anyways, you'll probably be seeing Sarahita's nails a lot from now on (side note: I love her nails. They're so cute and well shaped.) Maybe I can even get her to swatch some OPI or China Glaze polishes if you guys are interested!

photo (1)

The polishes used are: China Glaze Recycle as the base, and China Glaze Liquid Crystal for the glitter! I love this design. Even if it's not true to color (Recycle is hard to capture, but the design is what's important!), very neatly done! Plus it looks glittery and fun.

Merry Christmas, guys! And thanks to Sarahita! <3 p="p">


Monday, March 12, 2012

Nail design + March 2012 Birchbox

This was my nail design for last week.

SAM_0165

OPI Ink as the base, with the pink flowers made with L.A. Colors Pink striper, silver flowers made with Zoya Trixie, and the green made from a F21 Teal color.

I bought OPI Ink some time around last year, and this was the first time I've used it. It is beautiful! Seriously, I couldn't stop looking at my nails. This was also one of the first times lately that I've painted both hands with the same color (normally I only paint my left hand).

SAM_0172

With Essie Matte About You topcoat over top. I took this design off of Soompi, and the original poster did her design in matte, so I decided to try it. It's even prettier that way!

Also, today I came home to find my March 2012 Birchbox!

SAM_0180

Last month, Birchbox sent out an e-mail offering a Teen Vogue-partnered Birchbox, that would feature something from Essie. Of course, I jumped right on that and signed up for it. The e-mail said that they would be pretty much first come, first serve, so I wasn't sure if I was too late or not.

SAM_0181

The card that came with it.

SAM_0186

An Annick Goutal Petite Cherie perfume sample

SAM_0185

Tarte LipSurgence natural lip tint

SAM_0184

This one just blew my mind. A FULL-SIZE Essie A Cut Above nail polish (retail value $8), from their new Luxeffects collection. Wow. I just love Essie, but I figured it would be a small, mini bottle, like they put the Zoya Megan in for January. I'm still just amazed.

SAM_0183

Shiseido Oil Control Blotting Paper (10 pieces)

It also came with an offer for two years of TeenVogue for only $10, and a $10 off $75 purchase on ModCloth.

I'm so excited to use the stuff in this Birchbox. It's all so cool! Seriously. I'm not sponsored by Birchbox, I pay for it every month like everyone else, and I definitely encourage people to buy it if they like trying samples of new products!

I'll update soon with a(nother) nail polish haul!